Run Radiant. Make a hullcaulk (0,0) brush with 2048 heigth and length and 512 high. Now hollow it. Select grid size 9.
Zoom/move the 2D view so you can see the whole map.
Click Plugins/GtkGenSurf/Ground Surface... and this window opens up.

Make sure that:
• "Quake 3 Arena" is chosen as the Game
• "Ground surface" is selected for Orientation
• "From bitmap" is selected for the Waveform
• A "Roughness" value (how much irregularity should be introduced to the undulations) of 50 is fine, and pick any random seed you fancy (a starting point for the random numbers used - who cares really). With a non-zero roughness it means that areas you've specified as black, ie flat at ground level, won't actually be completely flat, there will still be little curves and bumps.
• "Antialiased lines" ticked is nice
Click on Extents tab.

We must enter the map extents, ie tell GtkGenSurf the size of the area to create terrain for. Seeing as we are using the whole map and we created the map with the lower left corner at (0,0), this is easy: the bottom left is (0,0) and the top right is (2048,2048).
As it happens, the Divisions default is x=8 and y=8, which happens to be what we want for our 8*8 terrain mesh. If the map had been 4096*4096 and the box size were still 256, you'd enter 16 and 16 here.
Click on Bitmap tab.

Browse to the BMP file you created. Don't worry about the map color boxes, they can be used to scale the undulations to increase the height range above 256, but we don't need that now.
Click the Preview box. This will show you what the geography will look like.
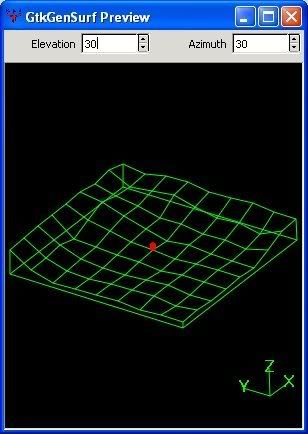
You can view the mesh from different angles by changing the Elevation and Azimuth of the viewpoint. Remember 30/30 is the default view.
By the way, I generally place the GtkGensurf window top left on my screen and put the preview window next to it, and then make the preview window as large as possible. This doesn't matter at 8*8, but it will at 80*80 or similar.
Click the Texture tab.
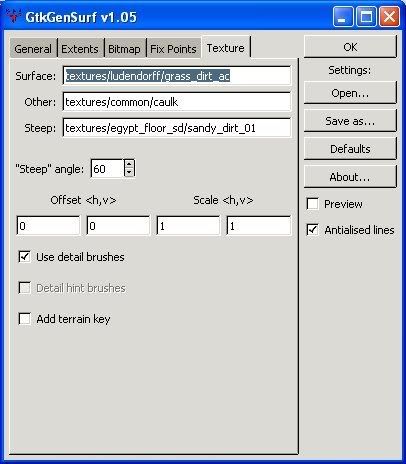
The Surface texture is the main texture that GtkGenSurf will use when it makes the terrain. You can change this to the texture you want. While I'm making the Ludendorff map I am using some grassy dirt texture. You should pick an organic texture, something like grass, dirt, snow, gravel, sand etc. There are some good grassy choices in the textures/temperate_sd set, so for now I suggest you choose master_grass_dirt3. There is no "browse" option, so you have to type it in. Don't put .tga or .jpg at the end, just give the texture name.
The Other texture should be left as caulk.
The Steep texture is the texture to use for steep angles, defined as 60 degrees or more unless you change it. You would make this either the same as the main surface, or if you wanted say hills to be grassy mainly but rocky on the steep slopes, you'd give a rocky texture here.
Make sure the "Use detail brushes" box is ticked.
Click the Fix Points tab.

The main window of interest is the preview window.

We can change the height of any point (except the yellow ones) by clicking on an intersection, and then entering the required height value. If you enter a value in the Range Affected box, nearby points will be adjusted too. As the adjacent points are 256 units away, you'd enter say 512 to affect your 2 nearest neighbours in all directions.
Click on a point and increase the height value so you can see the effect of your adjustment. I have made an exaggerated adjustment here to make it obvious.

I don't really want this spike, so I can release it by clicking Free and it will return to its original value.
What you will find is that it is hard to equate where you click on the grid to where in the terrain you are actually affecting. This is a pain. Sometimes I flip the image upside down with the Elevation and spin it around with the Azimuth to get the left and rights to match up - but then the top and bottom are reversed.

It's trial and error and you must pick the view orientation that makes the most sense to you.
I'll repeat the point adjustment, but this time with a Range of 512.

You'll see how the neighbouring points are dragged upward. This is neat and goes some way to compensating for the aggro you'll have in trying to work out which point is which...
You can adjust multiple points simultaneously by ctrl+clicking on the grid, and you can do rectangular ranges by shift+clicking.
For now we'll just leave it to the default values. If you've made the grid a mess, click Free All.
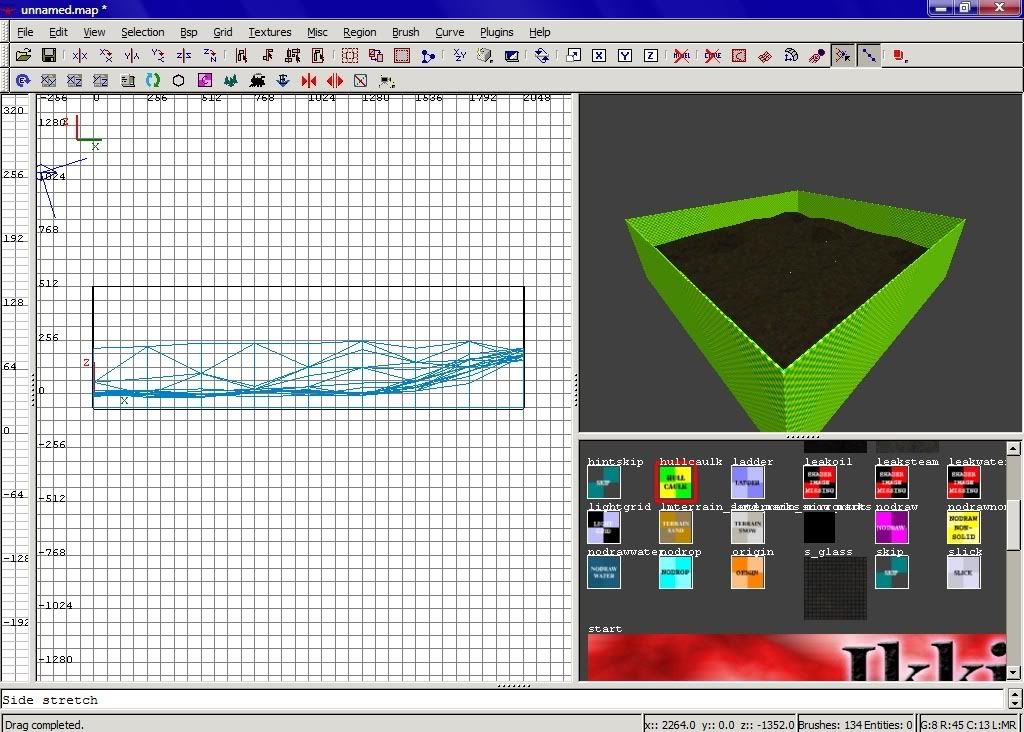
Press ok and look at your ground with side view. the ground dont fit, so move your hullcaulk ground to the point it hits the ground you've created! Now move your walls to the point it will hit the hullcaulk floor. You also have to move your walls one notch. Now it should be something like this (I hided the ceiling):