.hardBass<3
Owner


Number of posts : 94
Age : 30
Location : Emmeloord
Registration date : 2009-01-27
 | | Subject: 1# First lesson: Getting Started! Tue Mar 03, 2009 7:33 pm | |
| First download and instal GtkRadiant version 1.4. 1.4 is not the latest version, you also can use the other versions. What is Radiant and what does it do?Radiant is a map editor which allows you to create the physical geography of your map. You'll be able to create furniture, buildings and terrain in 2D and 3D, and explore and view your creation in 3D without actually running ET. When you save your creation Radiant creates a text file called " .map" in the maps folder. Later on you'll probably edit this file by hand, but don't do this for now.
Radiant also provides a way of compiling your map into the format required by ET to interpret and play it. The compiler will produce a file called ".bsp", also in the maps folder.
The Radiant display
Adjust your Radiant windows so that they have roughly the same dimensions as shown below.

Maximize the radiant window if you haven't, you're going to need all the screen space you can get.
The 2D window
Overhead and two side views available, view from X Y or Z dimension. Use ctrl+tab to cycle thru the views. Use mouse wheel to zoom in/out.
The 3D window
Free movement around your creation in 3D. Right click in 3D window to enable free movement. Move mouse to look around and arrow keys to move. Right click to quit free movement.
Texture window
The textures used so far in your creation, plus any others you have selected ready to choose from. Click on a texture to see its name shown bottom right.
Output window
The log of what loads when you open a map or load up textures. Also the log of your compiler activity.
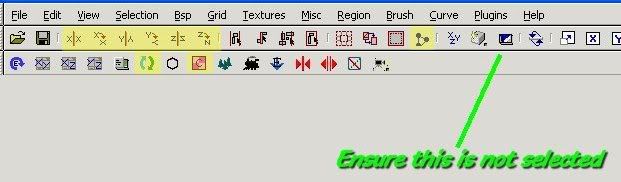
Toolbar
This looks intimidating, but happily you only actually use a very few of the buttons in practice. In the picture below I have coloured yellow the buttons I use - I don't use the others at all. Make sure the cubic clipping (indicated in the picture) is turned off, or you won't see all of your map in the 3D window.
 | |
|